Wednesday, November 21, 2012

Fabulous Home Made Cranberry Sauce

Fabulous Home Made Cranberry Sauce


This recipe is so easy and so fabulous, that you will never buy canned cranberry sauce ever again. Your friends and family will truly be impressed and your house will smell amazing. It is a win win recipe

12 oz bag of fresh cranberries
3/4 cup orange juice
2/3 cup brown sugar
1/3 cup white sugar (can use more if you like it sweeter)
2 oz gold rum

place all ingredients in a sauce pan and cook on med high for 15-20 minutes, or until most of the liquid has reduced, stirring occasionally. You will hear the cranberries "pop".... no worries, that is what you want them to do. Remove from heat and serve. Cranberry sauce can be made days ahead and brought to room temperature or slightly heated before serving.

Have a Fabulous & Frugal Day!!!!

Saturday, November 10, 2012

First Snow

Well here it is November, and getting our first snow.  This makes the realization of Christmas not seem so far away.  Am I prepared?  I shudder at that thought.  I am just not in the mood.  Not emotionally or financially in the mood. 
I am sure as the time draws closer I will get in the mood...  in the mood for it to be over.  I have never been much of a fan of Christmas.  I don't like cold weather.  It was fun when my kids were little.  I just hate the commercialization. 
What I do like is baking and making home made gifts.  So I am sure that will be my route this year. I do have a few things that I have picked up through the year for my family members that are far away.  I will mail them their Christmas goodie box the first week of December. 
I will enjoy having Christmas day off of work this year...  it has been many years since I have had this holiday off.  So that is what I will mostly look forward too.

Well with this snow comes soup weather.  I will clean out the fridge today and make some fabulous crock pot soup. 
Stay Warm and have a Fabulous & Frugal day!!!!

Saturday, October 27, 2012

Cold Buster

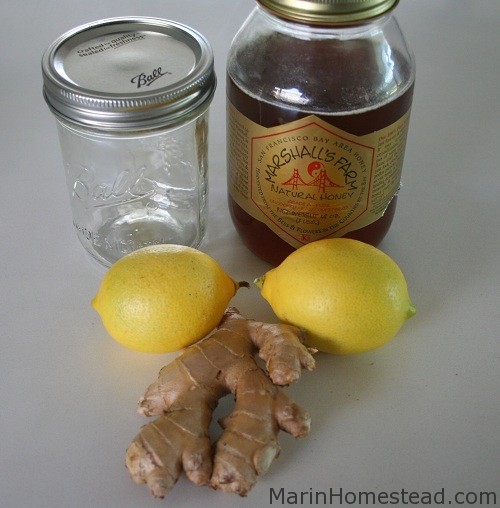
Lemon Ginger and Honey in a Jar (Cold Buster!)

The seasons are changing around here. Although the days are still warm, it is chilly in the morning and at night.
The leaves are starting to change color. Fall is definitely around the corner (but don’t tell my tomatoes that!).
It seems like during these season changes, the kids tend to catch more colds. Nothing major, just a slight sore throat or cough. When I see any signs of an oncoming cold, I give them this lemon-ginger-honey tea. It soothes their throat and the ginger helps them fight any nasty stuff going around.
I like to make this concoction and keep it in my refrigerator. Spoon a bit in some hot water for some soothing tea. It keeps for months.

Lemon Ginger and Honey in a Jar
makes about 2 cups
  • 2 lemons thoroughly cleaned and sliced
  • 2 piece of ginger about the size of your pointer and middle finger together sliced into coin size pieces
  • Honey (about 1 cup-maybe more)
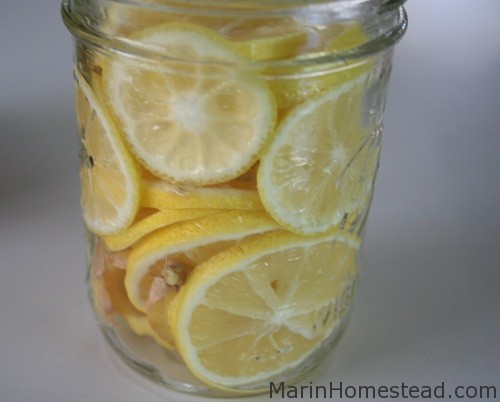
1. In a clean 12 oz mason jar (2 cup size) distribute lemon slices and ginger.


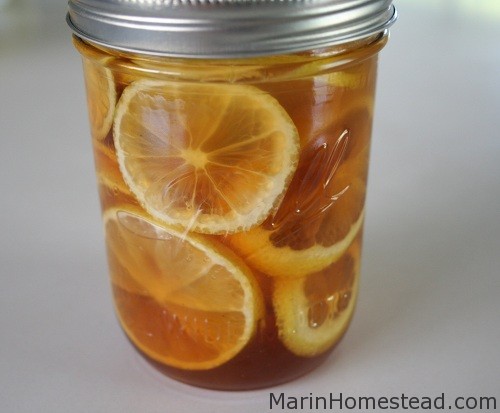
2. Pour honey over it slowly. This may take a few tries to let the honey sink down and around the lemon and ginger slices. Make sure when the honey has filled in all the voids, there is enough to cover the top of the lemon slices by a smidge.
3. Close jar and keep refrigerated. The mixture will form sort of a loose jelly. Add a spoonful with some hot water and drink as a tea.
187


Saturday, September 29, 2012

What A Summer

Oh boy what a whirl wind of a summer....  In June my daughter got married, I also quit my job and of 7 years in order to start a new job with weekends and Holidays off.  My Mother-in-law had a heart attack at the end of June, so that was back and forth to the hospital about 40 miles away.  She is doing much better now after the surgery and recovery.  In July I started my new job, still commuting and beginning to think I was too old to be starting over in a career.  I have learned a lot and also a lot about myself. 
I did not have empty nest syndrome for very long at all...  In July my step-grandson who is 12 moved in with me.  I got his room all set up in my daughter's old room.  And he just settled right in.  It is different taking care of a kid again....  strange how after a certain age they just become so self efficient, but so very nice.
In August my car was wrecked after a 17 year old girl ran a stop sign and just plowed right in to me. I am still working on recovery, and am in physical therapy.  Car wrecks suck...  not only financially, mind you my car was paid for, in super working condition,  and I loved it.  Well in the blink of an eye that all came to an end.  I had a rental car for a week and a half.  Then I drove my husbands Jeep for another week and a half.  I was having such a hard time shifting the gears, I just had to go and buy another car.  Come to find out through physical therapy the reason for the pain while shifting gears was dislocated ribs...  that the doctor did not notice. 
In September my mother-in-law had another bad spell and was pretty laid up due to a herniated disc in her back and she will be having surgery soon. 
I just want you all to know that at my age it is challenging to take care of the elders and the young ones in the family along with working and trying to recover from a car accident.  I am hanging in there and take one day at a time.  I think as I am getting older my compassion for others is better than I ever remember it before. 
I worked at my job for 2 1/2 months and now have been transferred to my home town....  no more commuting for me.  I can't wait to save the gas money and put that to a much better use.  I can't wait to come home for lunch.  No more eating junk or fast food, and not having to pack a lunch is going to be wonderful.  I am also looking forward to the free time (not driving).....  It looks like with all the changes that took place in a 4 month time period have been life altering, but I am really looking forward to these next 4 months. 
Have a Fabulous & Frugal Day!!!!

Sunday, August 26, 2012

The Joy Of Tomatoes

I have an over abundance of Tomatoes from the garden... I never thought I would ever admit this, but I am getting pretty sick of tomatoes. Here are 12 ways to eat raw tomatoes.

1. Tomatoes sliced (with salt & Pepper)
2. Tomatoes w/cottage cheese & pepper
3. Tomatoes w/ balsamic vinegar drizzled on them
4. Tomatoes w/ Mayonnaise spread on them (& pepper)
5. Tomato sandwich
6. Tomato & Cheese sandwich
7. Tomato stuffed with tuna (salad) and sprinkled with dill
8 Tomato stuffed with chicken salad
9. Tomatoes chopped and mixed with chopped olives, garlic and a little olive oil (spread this on crackers~YUM)
10. Tomatoes sliced on scrambled eggs
11. Tomatoes sliced on a hamburger patty
12. Tomatoes sliced on your favorite sandwich.. (maybe not peanut butter)

I really do love tomatoes and am glad they came on so well in the garden. Any other ideas out there using tomatoes?

Have a Fabulous & Frugal Day!!!

Friday, June 22, 2012

Clean Your Silver Jewelry


Instructions
1
Polish the silver with a soft, lint-free dust cloth. If needed, add a few drops of water to the cleaning rag to wipe away stickier buildup, then follow up with a dry cleaning rag to absorb excess moisture.
2
Spread a sheet of tinfoil across the base of a large skillet or basin, leaving the shiny side up.
3
Place all of the silver into the skillet or basin, with all pieces touching the foil. Pour in enough boiling water to submerge the silver.
4
Add 1 cup of vinegar and 1/2 cup of washing soda per quart of water used. Let the silver soak for 10 minutes.
5
Remove the silver with tongs or let the water cool until you are able to handle the silver items. Rinse the silver with warm water and polish with a soft cloth.

Have a Fabulous & Frugal Day!!!!!!

Sunday, June 10, 2012

Dishwasher Soap

Homemade Dishwasher Soap

I make my own soap by using 1/2 cup Arm & Hammer Super Washing Soda and 1/2 cup Borax 20 Mule Team. I use about 2 tablespoons in the dishwasher compartment. I've also added Citric Acid (from either canning products or tang) if needed. To tell if Citric Acid is needed, look at your silverware. If it seems to be a little gray then check your dishwasher book and it will tell you what to add and how much. My silverware has actually been sparklier with this than the expensive dishwasher tabs.
I also put white vinegar in the compartment for Jet-Dri.  My dishes are sparkly clean .....  This is just one more small way to beat the high cost of everything in the grocery stores. 

Have a Fabulous & Frugal Day!!!!!

Tuesday, May 15, 2012

Make Now, Bake Later

Here is some excellent information ( I found this in my local hometown paper some time ago) recipes for freezer cooking.  The great thing about freezer cooking is..... some night when you do not feel like putting forth the effort of dinner.....you go out to your freezer and pull out one of these casseroles.  Just remember to use your coupons and stack your coupons so you are not paying full price for your ingredients.  See how frugal you are? 
Have a Fabulous & Frugal Day!!!!

The refrigerator and freezer are wonderful kitchen tools if you use them to your advantage. Go-to dishes have never been easier, thanks to the classic preservation methods of refrigeration and freezing. With one stop at the grocery store you can have all the ingredients you need to create a variety of wholesome meals in a snap.


Know the storage basics. Heavy-duty freezer bags are perfect for keeping sauces, marinades and soups for up to one month, whereas glass containers can provide simple portion control for already assembled dishes. Well-wrapped, double-sealed meals will be less likely to get freezer burn and can be stored for up to two to three months. Make sure to clearly label and date your freezer meals for easy reference.

Thaw with care. There are several ways to thaw out your freezer meals, but only a couple of safe ones. You can place smaller containers in the refrigerator in the morning, and then pop them in the oven in the evening. If you are in a hurry, do a quick thaw by immersing the container in cold water or defrosting it on a low setting in the microwave.

Go Fifty-Fifty. Serve half to your family now, half later. This Fiesta Chicken, Rice and Bean Casserole made with the classic Mexican flavors of jalapeƱo, cumin, corn and black beans can be enjoyed more than once. The addition of instant chicken bouillon granules and evaporated milk give it an especially savory and creamy flavor.

Beef Penne Pasta Casserole
Ingredients:

1 pound dried penne pasta, prepared according to package directions

8 ounces lean ground beef

1 small onion, chopped

2 cups water

2 cans (6 ounces each) Italian tomato paste

1/3 cup red wine or water

1 tablespoon MAGGI Instant Beef Flavor Bouillon (Seriously just use any bouillon We know better than to brand loyal~ use those coupons)

2 cups (8 ounces) shredded Monterrey Jack cheese

Directions:
Preheat oven to 350° F.

Cook beef and onion in large saucepan, stirring occasionally, until beef is no longer pink. Add water, tomato paste, wine and bouillon; cook, stirring occasionally, for 10 to 15 minutes or until flavors are blended.

Layer ingredients as follows in ungreased 13 x 9-inch baking dish: 1/2 pasta, 1/2 sauce and 1/2 cheese. Repeat layers; cover.

Bake for 20 to 25 minutes or until heated through and cheese is melted. Season with salt to taste.

For freeze ahead:

Prepare as above; do not bake. Cover; freeze for up to 2 months. Thaw overnight in refrigerator.

Preheat oven to 350° F.

Bake for 45 to 55 minutes or until heated through and cheese is melted. Season with salt to taste.


Fiesta Chicken, Rice and Bean Casserole
Ingredients:

2 cups water

2 teaspoons Maggi Instant Chicken Flavor Bouillon

¾ cup long-grain white rice

2 tablespoons butter

1 cup finely chopped onion

1 bell pepper, any color, chopped

1 jalapeƱo, seeded and chopped

1 to 2 teaspoons ground cumin

2 large cloves garlic, finely chopped

1 can (12 fluid ounces) NestlƩ Carnation Evaporated Milk

2 large eggs, lightly beaten

3 cups cooked, chopped or shredded chicken breast meat (about 3 boneless, skinless chicken breast halves)

2 cups (8 ounces) shredded Monterrey Jack cheese with jalapeƱos

1 can (15 ounces) black beans, rinsed well and drained

1 ½ cups frozen, thawed corn, drained

2 tablespoons chopped fresh cilantro (optional)

Directions:
Preheat oven to 350°F. Lightly grease 13 x 9-inch or 3-quart casserole dish.

Bring water and bouillon to a boil in medium saucepan. Add rice; cover. Reduce heat to low; cook for 15 to 18 minutes or until rice is almost tender and most of liquid is absorbed (the rice will continue to cook in the casserole).

Melt butter in large saucepan over medium heat. Add onion, bell pepper, jalapeƱo and cumin. Cook, stirring occasionally, for 8 minutes or until tender. Stir in garlic; cook for 30 seconds or until fragrant.

Whisk together evaporated milk and eggs; stir into saucepan along with prepared rice, chicken, cheese, beans and corn. Spoon into prepared dish.

Bake for 40 to 45 minutes or until bubbly and edges are golden. Sprinkle with cilantro before serving.

For freeze ahead:
Prepare as above using two 2-quart casserole dishes; do not bake or sprinkle with cilantro. Allow casserole to cool to room temperature. Cover tightly with plastic wrap, then with aluminum foil; freeze for up to 2 months. Thaw overnight in refrigerator. Uncover. Preheat oven to 350°F. Bake for 60 to 70 minutes or until knife inserted in center comes out clean. Sprinkle with cilantro before serving.


Ravioli Lasagna
Ingredients:

1 package (20 ounces) refrigerated family size four cheese Ravioli, prepared according to package directions

1 container (15 ounces )reduced-fat ricotta cheese

1 package (10 ounces) frozen chopped spinach, thawed and squeezed dry

2 large eggs, lightly beaten

1/3 cup fat free milk

2 containers (15 ounces each) refrigerated marinara sauce

1/4 cup (.75 ounce) refrigerated freshly shredded Parmesan cheese

Directions:
Preheat oven to 350° F. Grease two 8 x 4-inch loaf dishes.

Combine ricotta cheese, spinach, eggs and milk in medium bowl. Place one-fourth pasta in each prepared dish. Add one-fourth sauce and half ricotta mixture to each dish. Top each with half remaining pasta and half remaining sauce. Sprinkle both dishes with Parmesan cheese. Cover one dish with plastic wrap, then over wrap with foil. Label and freeze for up to 2 months.

Cover remaining dish with foil. Bake for 40 to 45 minutes or until heated through. Let stand for 10 minutes before serving.

To bake frozen Lasagna: Place dish in refrigerator overnight. Preheat oven to 375° F. Remove foil and plastic wrap; recover with foil. Bake for 1 hour or until heated through. Let stand for 10 minutes before serving.


Berry Banana Fro Yo Shake

I found this on the Dole website...  It totally looks worth trying....  I recently watched "Under Cover Boss" and the CEO of Dole and Fresh Express was on there, and he seemed like a great guy and a great boss.  Now when I see the Dole Bananas and Fresh Express salad at the store...  it makes me smile.  I know where this stuff comes from.......
Have a FABULOUS & FRUGAL Day!!!!


This is a cross between a smoothie and a milk shake using frozen yogurt and fresh fruit. Perfect for a quick dessert, but even good enough for breakfast and takes less than 5 minutes to make.


I recently fell in love with Stonyfield's Organic Vanilla Frozen Yogurt. I can't believe how good it tastes and it's hard to believe it's fat free! If you haven't tried it and are looking for a healthier vanilla ice cream alternative, you'll love it and it has the same live cultures as it's yogurt.

For best results, make sure the bananas are really ripe, the riper the sweeter your shake will be. I like to use frozen bananas, you can even use frozen berries!


Very Berry Banana Fro Yo Shake

Skinnytaste.com

Servings: 1 • Serving Size: 1 shake • Old Points: 4 pts • Points+: 5 pts

Calories: 211.7 • Fat: 2.1 g • Protein: 5.6 g • Carb: 48 g • Fiber: 5.7 g • Sugar: 26.3 g

Sodium: 90.6 mg

Ingredients:

1/2 cup mixed berries (blueberries, blackberries, strawberries)

1/2 ripe frozen banana

1/2 cup organic nonfat vanilla frozen yogurt (Stonyfields)

1/2 cup unsweetened vanilla almond milk (or skim, soy, etc)


Place all the ingredients in the blender and blend until smooth

Friday, April 13, 2012

Crock Pot Chicken Enchilada Casserole

I have been using my crock pot all winter...  and will continue using it through out spring.  This is a fabulous and easy recipe. 
Have a Fabulous & Frugal Day!!!

Slow Cooker Green Chile-Chicken Enchilada Casserole


Bring the fabulous flavors of Mexico to your dinner table with this slow cooked chicken casserole that’s made using Progresso® beans and Old El Paso® chiles and enchilada sauce.

Prep Time
15 Minutes

Total Time
6:20 Hrs:Mins

Makes 6 servings

2 cans (4.5 oz each) Old El Paso® chopped green chiles

1 can (10 3/4 oz) condensed cream of chicken soup

1 can (10 oz) Old El Paso® green enchilada sauce or other green chile enchilada sauce

1/4 cup mayonnaise or salad dressing

12 corn tortillas (6 inch), cut into 3/4-inch strips

3 cups shredded cooked chicken

1 can (15 oz) Progresso® black beans, drained, rinsed

2 cups shredded Mexican cheese blend (8 oz)

2 large tomatoes, chopped (about 2 cups)

2 cups chopped lettuce

1/2 cup sour cream

1.Spray 3- to 4-quart slow cooker with cooking spray. In cooker, spread 1 can of the green chiles. In medium bowl, mix remaining can of green chiles, the soup, enchilada sauce and mayonnaise.

2.Arrange 1/3 of the tortilla strips over chiles in cooker. Top with 1 cup of the chicken, 1/2 cup of the beans, 1/2 cup of the cheese and 1 cup of the enchilada sauce mixture, spreading to edges of cooker to completely cover tortilla strips. Repeat layers twice, reserving last 1/2 cup of cheese.

3.Cover; cook on Low heat setting 6 to 7 hours.

4.Top with remaining 1/2 cup cheese. Cover; cook about 5 minutes longer or until cheese is melted. Serve with tomatoes, lettuce and sour cream.

Makes 6 servings Make the Most of This Recipe With Tips From The Betty Crocker® Kitchens

Tips

Rotisserie chicken works well for this recipe. Just remove the skin and bones, and shred the meat with 2 forks. One average rotisserie chicken yields about 3 1/2 to 4 cups cooked chicken.

Red enchilada sauce can be used. It will give a pink tint to the finished recipe.

Thursday, April 12, 2012

25+ Home Made Blemish Busters

I found this fabulous information over at Tipnut.com and just had to share.  These are home made remedies for skin blemishes.  I currently use apple cider vinegar and Witch Hazel on my face and back with very good results.  I think this is a frugal woman's handbook for inexpensive and natural ways to have better skin, with all the directions included.......

Have a Fabulous & Frugal Day!!!!

Quite a list of remedies here folks! These can be used for banishing a single pimple or two, treating acne, recipes for maintaining clear skin and I’ve also listed some tips at the bottom of the page to help with rosacea and a blackhead peel recipe.


Note: If acne seems to worsen at the beginning, keep in mind that the treatments are drawing out impurities and this could be the cause. Steady applications should show improvement over time. Also results will vary so if one doesn’t do the trick, try another until you find one that works for your skin.

Directions: Pick a remedy below then apply directly to blemish or your whole face then allow to dry for at least 20 to 30 minutes before washing off (unless otherwise noted).

Keep ingredients away from your eyes. If you are allergic to any of the items, do not use since topical applications could still trigger a reaction.

■Aloe vera: Apply fresh aloe vera gel to trouble spot and allow to dry before washing off.

■Alum: Mix 1/2 tsp alum with 1 TBS warm water to make a paste, apply to pimple.

■Apple cider vinegar: Recommended for acne, use a cotton ball to wipe vinegar over face. May sting a bit and may smell, but stick with it if you can. If it’s just a pimple or two that’s causing you grief, you can use a q-tip to dab on trouble spot as needed.

■Aspirin mask: This one’s from Dr. Oz…Crush 6-12 non-coated aspirins into a powder then mix with freshly squeezed lemon juice. Soak for 5 to 10 minutes until the mixture dissolves into a paste then apply to breakout. Remove with baking soda and water. Why it works? Aspirin contains salicylic acid which acts as a chemical peel and lemon juice contains vitamin C. Source: doctoroz.com. Not recommended for those who suffer from rosacea since the salicylic acid could aggravate it.

■Banana: Mash a ripe banana then apply to face. Allow to dry and leave on for a couple hours (if possible) before washing off.

■Calamine lotion: Allow to dry overnight before washing off.

■Cinnamon & honey: Good for acne, mix cinnamon powder and honey into a paste then apply to skin. Allow to set for at least an hour before removing. Daily treatments are recommended.

■Cucumber mash: Peel then puree in a blender, apply to skin and allow to dry for at least an hour. Good for acne.

■Fuller’s earth: Make a paste of freshly squeezed orange juice with Fuller’s earth and apply to trouble spot. Allow to dry for 20 to 25 minutes before washing off. Can use grated orange peel instead (dried).

■Honey: Can dab pure honey to blemish, allow to dry then wash off or you can mix 50/50 honey and freshly squeezed orange juice before applying to skin. You may find it beneficial to apply a hot compress first.

■Milk of Magnesia: (acne) Apply to skin each night then wash off in the morning.

■Neem: Make an infusion by covering a handful of neem leaves with 2 cups of boiling water. Cover and steep for about 10 minutes then strain. Allow to cool then mix with Fuller’s earth to make a paste.

■Olive oil: (for acne and breakouts) After washing face with a mild soap, apply a light layer of extra-virgin olive oil to skin three times a day (do not wash off). An oily substance may seem contrary to logic (clogs pores) but olive oil seems to both heal the skin and draw out impurities. You may experience more breakouts at first but after a few days this will settle down.

■Orange rinds: Mix equal parts grated orange rind (dried), plain yogurt and rosewater. You could also make a paste with ground peels (dried) and milk (keep on skin for about an hour before washing off).

■Pineapple juice: Apply to trouble spot.

■Sandalwood: Make a thick paste with equal parts sandalwood powder, turmeric powder and milk. Apply then leave overnight and wash off in the morning.

■Tea tree oil: Dab directly onto trouble spot with a q-tip.

■Toothpaste: (not gel) Just a dab will do ya, apply then let dry overnight.

■Turmeric: Mix turmeric with a bit of milk or plain yogurt to make a paste then apply to blemish. You could also mix 1/2 teaspoon turmeric with a bit of water to make a paste then apply to trouble spots (4 times per day).

■Witch hazel: Dab directly on pimple 4 or 5 times per day.

Clear Skin Helpers:

■Buttermilk: Apply each day as needed to help clear acne.

■Coconut Oil: Apply a thin layer to skin each day to help fade acne scars.

■Cold brewed tea: Wash skin daily with this.

■Grapefruit Seed Extract: Add a few drops to a mild liquid facial soap and use to wash skin daily. You can also use tea tree oil this way.

■Strawberry leaf infusion: Wash skin with this twice a day, morning and night (1/4 cup strawberry leaves and 1 1/2 cups boiling water, cover and steep for 2 hours then strain and chill before using).

■Tea Tree Oil: Add 10 drops of tea tree to 1 cup of lukewarm water then use to wash face (avoiding eyes).

Rosacea:

Do consistent, daily treatments for at least two weeks before determining whether or not this will work for you.

■Apple Cider Vinegar: Wash face with a gentle soap, rinse well, pat dry then wipe with a cloth dipped in apple cider vinegar (once per day).

■Chamomile Infusion: Cover 2 teaspoons dried chamomile flowers with 1 cup boiling water, cover then steep for 10 minutes. Strain, cool and then apply as a lukewarm compress.

■Flaxseed Oil: Consume 1 teaspoon three times daily or try making a facial scrub with ground oatmeal (uncooked) and flaxseed oil then use to gently exfoliate skin.

■Green Tea: Drink at least 2 cups a day and wash skin with it daily (cool after brewing). If you’re new to green tea, you’ll find plenty of info here to get you started. You can also use a 50/50 mix of green tea and chamomile tea as a facial toner.

■Lavender Infusion: Same as the chamomile infusion above but using dried lavender buds instead.

■Rose Water: Wash face daily with rose water. One recipe you can try: For every 1 firmly packed cup of petals, pour 2 cups boiling water over top. Cover and steep until the liquid is cool. Strain, squeeze out the liquid from the petals, and refrigerate the rose water in a sterilized jar. You’ll find more recipes here.

Blackheads:

*First published May 8, 2007 and moved to this page for better organization

Try a facial steam bath first (instructions below) then use the recipe, this will open up the pores as well as soften up the blackheads for easier removal.

1 TBS Unflavored gelatin

1 1/2 TBS Milk

■Mix together the gelatin and milk then heat in the microwave for about 12 seconds. Remove from microwave and stir with a wooden stir stick (a clean one!). Generously apply to problem areas on the face. Be careful not to apply too close to the eyes.

■Let completely dry (between 15 to 30 minutes) then carefully peel it off. The gunk clogging your pores will be stuck on the peel, the result is similar to the expensive removal strips you can buy.

■After removing the peel, wash face in very cold water to close the pores.

Facial Steam Bath:

First wash your face with facial cleansing soap and water. Then fill a bowl with boiling water and place your face down close to the water to be near the heat. Cover your head with a towel to trap the steam around your face, stay put for about 10 minutes then make and apply the treatment peel above.

■Optional: Add tea bags or Epsom salt or dried lavender to the boiling water.

Wednesday, April 4, 2012

Home Made Mayonnaise

Leslie Voth ....  Thanks for sharing this recipe, With Mayonnaise at almost 4 bucks a jar.....
Have a Fabulous & Frugal Day

Mayonnaise for you Recipe


Ingredients

Eggs, vinegar, lemon juice, water, salt, cayenne pepper and extra virgin olive oil.

Blend ingredients

Separate three eggs and put their yolks in a mixing bowl, along with two tablespoons of vinegar, two tablespoons of water and two tablespoons of lemon juice.

Heat

Heat the mixture on your stove top at around 150 degrees for one minute. Stir continually for that minute.

Cool

Place mixing bowl on the counter and allow the mixture to cool for a few minutes.

Add ingredients for flavor

Add a half tablespoon of cayenne pepper, a half tablespoon of salt and a bit of spicy mustard to the mixture. Then whisk the mixture until the ingredients blend together. Desire a little more kick? Consider splashing a bit more pepper in there next time. Want thicker mayonnaise? reduce the water.

I like to add a little garlic to this for extra flavor.

Olive oil

Slowly add high-quality extra virgin olive oil, teaspoon by teaspoon, perpetually whisking, until your mixture reaches the proper consistency of mayonnaise. This should take up to one and a half cups of olive oil. Remember to fully integrate each teaspoon of olive oil before moving onto the next.

I hope you give this a try because it is worth it.

Tuesday, March 20, 2012

Back, Neck And Shoulder Pain

I at times suffer from neck and shoulder pain.  I have spent money on pain medication, pain patches, doctors, and physical therapy.  I do believe that posture and stress are huge factors to my ailments as well as sitting at a desk and typing for 8-10 hours per day.  I hope these tips will help you I found them over at Get Rich Slowly 

Have a Fabulous & Frugal Day!!!!!


Cheap Ways to Relieve Your Aching Back


Posted: 20 Mar 2012 05:00 AM PDT

This post is by staff writer April Dykman.

How’s your posture right now? Are you slumped over in your chair, craning your neck to see the computer screen?
Over time, those habits could cost you both in terms of health and doctor appointment copays.

Last month I wrote about my ongoing search for a cure for shoulder and neck pain, and how numerous appointments with doctors and therapists cost thousands of dollars over the years and failed to fix the problem. Then, a last-minute appointment with a new massage therapist changed that. To quickly recap, she told me to start wearing my night guard consistently, not just when I felt I was grinding my teeth, and she suggested I replace my 11-year-old mattress. The first tip starting working within a couple of days, and at the writing of that article, I was waiting for my mattress to arrive.

Several readers asked for an update after I had a chance to try the new mattress. Well, I love it. I no longer need to sleep with a body pillow, and my arms haven’t gone numb in the middle of the night, which they used to do regularly. I can’t tell you with any certainty if buying an organic mattress is worthwhile, but buying a new mattress did seem to help my shoulder and neck pain.

Your pain in the neck

Last week I sat down with the massage therapist who cured what ailed me to talk about some inexpensive ways to change habits that cause body pain, as well as ways to relieve aches. Many preventative measures and solutions are cheap (or free), and while your doctor’s advice is best, sometimes you need to get through a day or two until you can get in to see someone.

For advice on how to do that, I interviewed Rachael Bercey, a massage therapist at Castle Hill Fitness in Austin, Texas. Rachael specializes in neuromuscular therapy, deep tissue sports massage, myofascial and trigger point therapy, and kinesio taping. She received massage training at the New Mexico School of Natural Therapeutic, earned her neuromuscular therapy certification, and counts among her past clients professional, Olympic, University of Texas, amateur, and weekend warrior athletes. She’s also a certified personal trainer.

The following are her top suggestions for frugal ways (most are free!) to prevent or relieve body aches:

Look at how you’re sitting right now. Are you pointing your feet because they don’t rest on the floor? Is your chair on rollers, and if so, are you using your feet to stabilize it? Are you sitting on one foot (like I often do)? “Your feet should rest on something or be propped on something like yoga blocks or a sturdy box to avoid your feet hanging from or hooking under the chair,” says Rachael. “Even better is to prop the feet at a natural angle rather than flat — a rocking foot rest is a possible solution, but a bit pricey.” (J.D. made his own footrest a few years ago.) Also, your monitor should be at eye level, right in front of you, and the keyboard height should be adjusted to where your elbows can hang comfortably at the side of your body, shoulders are relaxed, and your wrists not bent up or down or to either side. “Good chairs are expensive,” says Rachael, “but you can go to the dollar store and find something that will raise your monitor,” she says. Or use something you have around the house. To adjust your keyboard, consider a keyboard tray that attaches under your desk. Cost: $20 for a keyboard tray

Get up every 45 minutes. Rachael says lack of movement is often the cause of body pain, so set a timer to sound off every 45 minutes to remind yourself to get up and walk around. She says it’s easy to get used to the timer and to start ignoring it, so try recording a message to yourself instead. You may be more likely to pay attention to the sound of your own voice. Cost: Probably free, since it’s likely there are already alarms and apps on your phone and computer

Engage your abs. When you exercise or stand in line at the grocery store, how is your posture? Do you engage your core muscles? Obviously you don’t need to squeeze your abs as hard as you can while standing in the express lane, but stand evenly on both feet and don’t slouch. “If you stand with your legs closer together, it’ll help you stand more erect and use the core,” says Rachael. Also, relax your jaw. “Many people clench their jaw when they workout to stabilize their body,” she says. “Relax the jaw and engage the core.” Cost: Free

Drink more water. I know, I know. You’ve heard it a million times. “Dehydration lowers viscosity in your body,” she says, “which can lead to aches and pains.” The general rule is to take your weight in pounds and divide it in half to get the number of ounces you should drink. If you work up a sweat, drink more. Cost: Almost free to free, depending on where you get your water

Rethink your bags and purses. If you carry a laptop in a backpack, use both straps. “I know it’s nerdy, but a waist belt on a backpack is really helpful, too,” she says. If you carry a side satchel, switch up which shoulder you sling it over. As for purses, if you’re guilty of toting around the kitchen sink, Rachael says to rethink your necessities. “Think about what you really need, and lighten your load,” she says. “I know ladies who have scissors and tape in their purses — you can find that wherever you’re going if you really need it!” Cost: Free

Walk a mile in your shoes. Rachael likened our bodies to a house.”Good shoes are like your foundation,” she says. “If there’s a problem there, like a crack in the foundation it’ll refer upward, causing other problems.” It’s hard to offer advice about footwear, however, because people are so different in terms of structure, lifestyle, and habits. But if your running shoes are worn out, that can cause problems in your feet, ankles, and knees on up. “You also want to switch out your shoes,” says Rachael. “Don’t wear the same pair to the gym and then to work in the yard. Rotating is better for your feet.” If you aren’t sure if you’re in the right shoes, go to a specialty running store or a shoe store that offers gait analysis (you might even go to a few before you decide to buy). Cost: Approximately $100 for a new pair of shoes, though there are both cheaper and more expensive shoes out there

When you’re injured, start with ice. If you injure yourself on Saturday and can’t see a doctor until Monday, you can alleviate some pain by icing the injury. “Sometimes an injury isn’t visibly inflamed, but it’s internally inflamed,” says Rachael, “and heat can exacerbate the problem.” Until you know the nature of the injury, start with ice, especially for the first 48 hours, she says. “Cold reduces blood flow to the area and can inhibit pain receptors,” she says. “When you remove the cold pack, the blood rushes back to the area, but sometimes the pain is still reduced or gone completely.” (One exception to the rule on icing: if compartment syndrome is suspected.) Rachael says if you don’t like cold sensations like ice packs, try putting a heating pad or warm water bottle on your stomach. “That can distract you from the cold sensation,” she says. Cost: $11 for the ice pack Rachael likes best (or free if you already have one of your own)


Try the tingly stuff. Another pain relief solution Rachael recommends is ointment or gel like Traumeel or BioFreeze. “Traumeel is homeopathic and topical, and comes in ointment and gel form, though I prefer the ointment,” she says. “You can get it at a health food store, and one tube can last a couple of years.” Cost: $20 for 3.5 ounces of Traumeel or $8 for 4 ounces of BioFreeze

Use tennis balls off the court. This is a travel-friendly tip especially great for cramped coach seating on flights, airport layovers, long car rides and other physical discomforts. Place a tennis ball between you and a wall to work out knots and stiff muscles in between your shoulder blades, in your glutes and hamstrings, and other tight areas. “It’s super cheap and easy to pack,” says Rachael. “I like using a wall because it gives you more control than if you place it on the floor and lay on it.” Cost: $5 or less for a pack of three

Go high-tech. Got low back pain? Yes, there’s an app for that. Rachael says there are a lot of apps that are good for the body, but the one on her phone is called Pocket Therapy. You select your injury, and the app gives you suggested exercises to alleviate pain, plus helpful visuals. Rachael also likes free mediation apps, Nike Training Club to get moving, and Daily Dozen Posture for exercises to improve your posture. Cost: Free for Nike Training Club, $2 for Pocket Therapy and Daily Dozen Posture

I’m not very good about taking breaks or sitting in a good position. For example, right now I’m sitting on the couch with my laptop on my lap and my feet propped up on an ottoman. Ergonomic fail. But Rachael says I can plug in a keyboard and prop my laptop up on a book or two to fix that. Easy enough and pretty inexpensive.

I’m not ready to show her my purse, though. Baby steps, people.
Monday, February 20, 2012

The Power of Less

I have come across a fabulous and free ebook that you can download.  And I wanted to share.  Happy reading

tinyurl.com/thriving-on-less

This is the road map for enjoying a happier, more simplified life.

Have a Fabulous & Frugal Day!!!!

Tuesday, February 14, 2012

Frugal Deep Cleansing Hair Treatment

Hair Deep-Cleansing


Recently I asked my hairdresser to recommend a shampoo that removes build-up from hair. Although he sells an expensive line of hair care products, he told me not to spend $10 on a shampoo designed to do that. Instead, he suggested that I go to the grocery store and buy a box of baking soda.


He then suggested that the next time I shampoo my hair, simply put some shampoo in my hand and add some baking soda. Mix the two together in my palm and then shampoo my hair as usual. After rinsing, use conditioner. Well, I tried it, and it works great! It left my hair looking shiny and soft. I gave myself a salon-style look for less.

Have a Fabulous & Frugal Day!!!!!

Thursday, January 12, 2012

Fabulous & Frugal: Laundry Soap

Fabulous & Frugal: Laundry Soap: Okay... Here it is!!! Everyone has been asking me to post my laundry soap recipe so... here you all have it 2 cups Borax 2 cups Super...

Tuesday, January 10, 2012

Extreme Cheapskates

TLC has done it again....  I watched this show last night.  Extreme Cheapskates looked at the lives of 4 families, The first guy was a dumpster diver who found wilted roses, and a tea kettle for his wife for their 25th wedding anniversary.... yes he found these "treasure's" in the dumpster.  While he was at a cafe for dinner he would go around to other people's tables and ask them for their left over food.  He embarrassed his wife a couple of different times. 
The second family features a creative way to save on toilet paper.  She makes her own toilet paper out of cloth, her clean cloth's hang right next to the toilet (in her bathroom) and her used cloth's go in a bucket right next to the toilet...  she claims she never has to touch them, just picks up the bucket and dumps them in the wash machine.  This lady has 6 kids and shops at a grocery outlet that deals with expired food, and that is what she feeds her kids along with salad that she picks or forages at the park.
The third story featured a couple that I am actually familiar with...  Jeff Yeager has actually written a couple of books.  The Cheapskate Next Door (and I cannot remember the other one right now.) At various times during the year he goes on a fiscal fast, where he spends absolutely no money for the entire week.  At least not his money...  he does scrounge around for loose change in couch cushions, phone booths, and laundry mats.  Jeff did some bargaining with a butcher for a couple of goat heads that he cooked for he and his wife for dinner.  Jeff was very funny and entertaining...  I enjoyed his take on frugality. 
The last story featured a young man who bartered for different things...  he recited poetry at a donut shop for a donut and coffee, and helped out his friend with bartering who was putting together an engagement party.  He also worked by taking out trash and sweeping at a barber shop so that he could get his hair cut. Very creative ways to work for things that you need. 

This show was completely entertaining and gives a whole new meaning for the definition of Cheapskate....  It was an extreme look at outrageous ways to save a dollar....AND after watching this show, my kids no longer think of me as a cheapskate....

Have a Fabulous & Frugal Day!!!

Saturday, January 7, 2012

Get Out Of Debt Using Snowball Method

This is exactly the snowball method I am using...  It seems to be working, yes, at times it seems like it is taking forever...  but I am just going to hang on in there and keep my nose to the grindstone..  Debt Free Baby!!!!

Have a Fabulous & Frugal Day!!!!!

http://christianpf.com/?utm_source=ChristianPF+Daily+Newsletter&utm_campaign=d4a3a294bf-DAILY_EMAIL_CAMPAIGN&utm_medium=email


Get Out Of Debt With The Debt Snowball Method – GS4


Jan 05, 2012 08:00 am
Bob


Debt Snowball: The Preferred Method for getting out of debt

Creating a debt snowball is my preferred method of getting out of debt. The strength of using this method is that it focuses on the behavioral side of personal finance rather than the mathematical. Since we are not robots that always do exactly what we know we should, I recommend this method for most people.


These are the simple steps to snowball your debt

Create a list of all of your debts: credit cards, car loans, student loans, mortgages, etc…

Next to each one write down the total balance owed.

Re-order these from smallest to largest debts (use Excel or Google Docs to make this simpler.)

Pay the minimum payment on all of the debts – except the smallest one.

Put every extra dollar you can find towards paying off that smallest debt.

Celebrate like crazy when you get that first debt paid off.

Take the amount you were paying towards the first debt and put towards the next smallest debt. Do this until this one is paid off.

Celebrate again!

Continue this process until each one is paid off.

What you will find is that each time you pay off a debt, the “snowball” gets larger. Since you are taking the amount you used to pay off the first debt and putting it all + the minimum payment that you were already paying to the second together, you are making more of an impact towards that debt. Each time you pay off a debt, the snowball gets larger and more powerful – which is great, because it just increases the speed that each debt gets paid off.


The numbers don’t lie

If you are like most logical people out there (like me ) you are probably saying, “you could save more money by paying the highest interest rate cards off first.” You are right – calculators do not lie and they will give you the correct logical answer. Paying your credits cards off starting with the highest interest rate to the lowest is “mathematically” the best idea. But, let’s look it at from another angle:


If we DID what we knew we SHOULD do 100% of the time, using the mathematical approach would be best. But, we are emotional beings and even the most disciplined among us still have emotions and are affected by them.


Computers use logic 100% of the time. Humans do not. We were not created to. We make decisions based on our emotions. We get let down, we get encouraged, we feel motivated, we get scared, we feel hopeful, we feel like quitting. These are all emotional states that each one of us could feel on any given day!!


Knowing that we are emotional beings, the key is to use our emotions to our advantage. Just like jogging with the wind at your back, it is a nice little boost to use our emotions to give us a little edge. So, rather than tackling the debt like a math problem, we can tackle it in a way that will give us emotional boosts! After all, isn’t it better to get out of debt and spend an extra $100 in interest than to give up half way to our goal because we were discouraged?

Monday, January 2, 2012

Homemade Dishwasher Soap

Happy New Year!!!  My goals are to pay off debt and live as frugally as possible.  I am also going to add to my Emergency fund this year.  What are your goals or resolutions for this year? 
Here is a recipe I found for Dishwasher soap...  I will be making up a batch of this and giving it a try. 

Homemade Dishwasher Soap


I make my own soap by using 1/2 cup Arm & Hammer Super Washing Soda and 1/2 cup Borax 20 Mule Team. I use about 2 tablespoons in the dishwasher compartment. I've also added Citric Acid (from either canning products or tang) if needed. To tell if Citric Acid is needed, look at your silverware. If it seem to be a little gray then check your dishwasher book and it will tell you what to add and how much. My silverware has actually been sparklier with this than the expensive dishwasher tabs.

Have a Fabulous & Frugal Day!!!!!